# University tutorial
This tutorial is an adaptation of the classical Ontop university tutorial (opens new window) to Ontopic Suite.
# Preparation
# Install the tutorial database
# Windows Desktop
The tutorial database is provided in the folder %AppData%/OntopicSuite/sample-db with the name university .
# Docker-compose
The tutorial database is normally installed as part of the recommended procedure for Docker-Compose (see the dedicated section). It should be available with destination-tutorial-db as hostname.
If it is not the case:
- Go to the
suitegit repository - Run the command
docker compose -f docker-compose.yml -f tutorial/docker-compose-tutorial.yml pull && docker compose -f docker-compose.yml -f tutorial/docker-compose-tutorial.yml up`
# Create a project
- Connect to Ontopic Suite (by default http://localhost:8081 (opens new window)) and login with your user account
- Create a project
University_Tutorialand add an optional description. Select typeSample DBand save - Open the project
# Provide the database credentials
Go to the
Settingspage# Windows Desktop
- You can see the prefilled credentials for connecting to the database
- Database:
H2 - Driver:
org.h2.Driver - Database name:
postgres - Username:
sa - Connection URL:
jdbc:h2:tcp://localhost:9092/C:\Users\<username>\AppData\Roaming\OntopicSuite\sample-db\destination-db;ACCESS_MODE_DATA=r
- Database:
- Change the end of the connection URL from
destination-tutorial-dbtouniversity:- Connection URL:
jdbc:h2:tcp://localhost:9092/C:\Users\<username>\AppData\Roaming\OntopicSuite\sample-db\university;ACCESS_MODE_DATA=r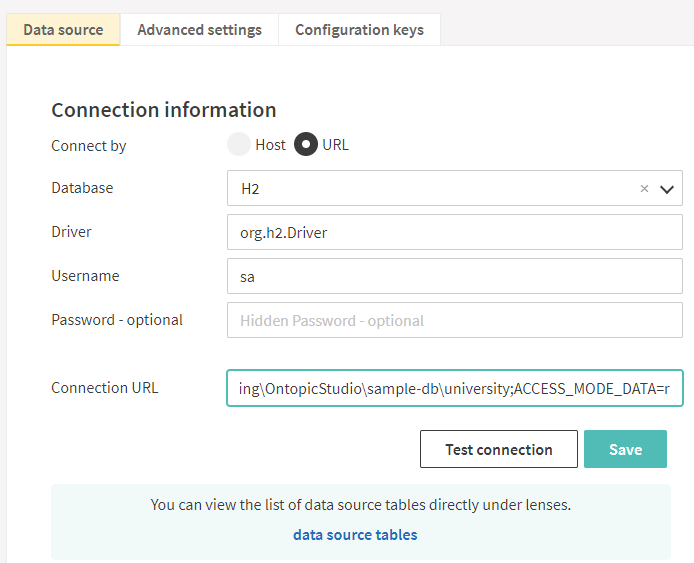
- Connection URL:
# Docker-compose
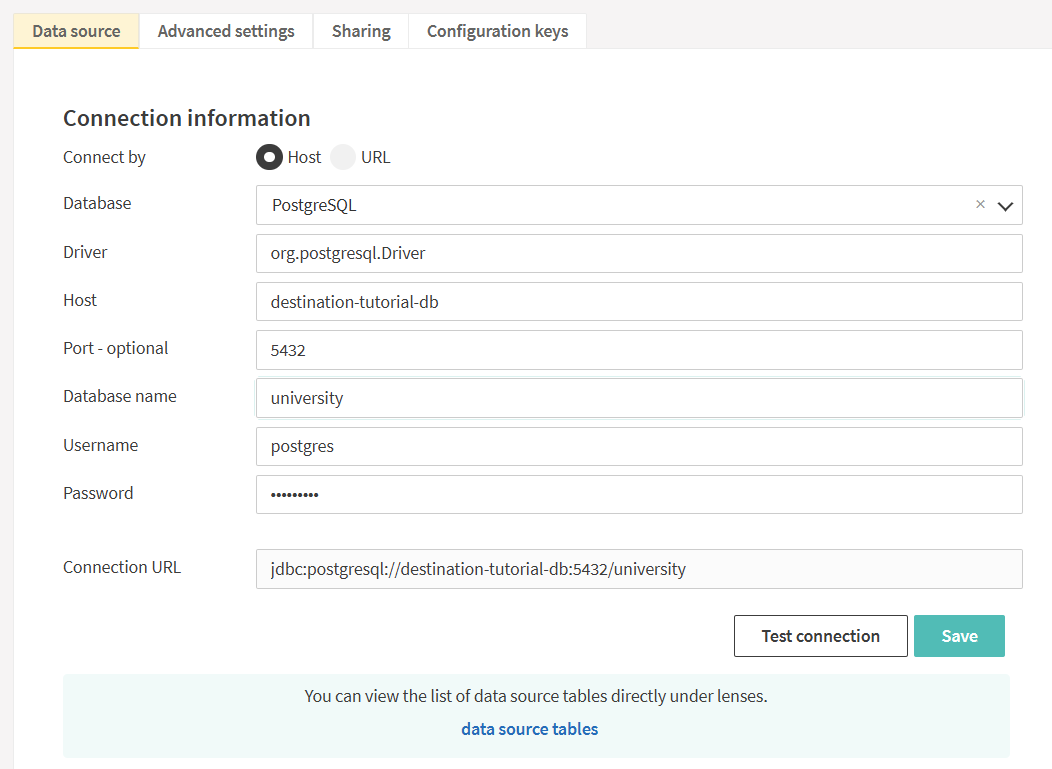
- You can see the prefilled credentials for connecting to the database
- Database:
PostgreSQL - Host:
destination-tutorial-db - Database name:
postgres - Username:
postgres - Password:
postgres2
- Database:
- Change the database name:
- Database name:
university
- Database name:
- You can see the prefilled credentials for connecting to the database
- Save the credentials and go to the
Data Lensespage. You see there, on the left, the list of database tables and views.
# Dataset
# University 1
The dataset is composed of the following tables:
uni1.student
The table uni1.student contains the local ID (s_id), first and last name of each student.
| s_id | first_name | last_name |
|---|---|---|
| 1 | Mary | Smith |
| 2 | John | Doe |
The column s_id is the primary key.
uni1.academic
Similarly, the table uni1.academic contains the local ID (a_id), first and last name of each academic staff member, but also information about their position.
| a_id | first_name | last_name | position |
|---|---|---|---|
| 1 | Anna | Chambers | 1 |
| 2 | Edward | May | 9 |
| 3 | Rachel | Ward | 8 |
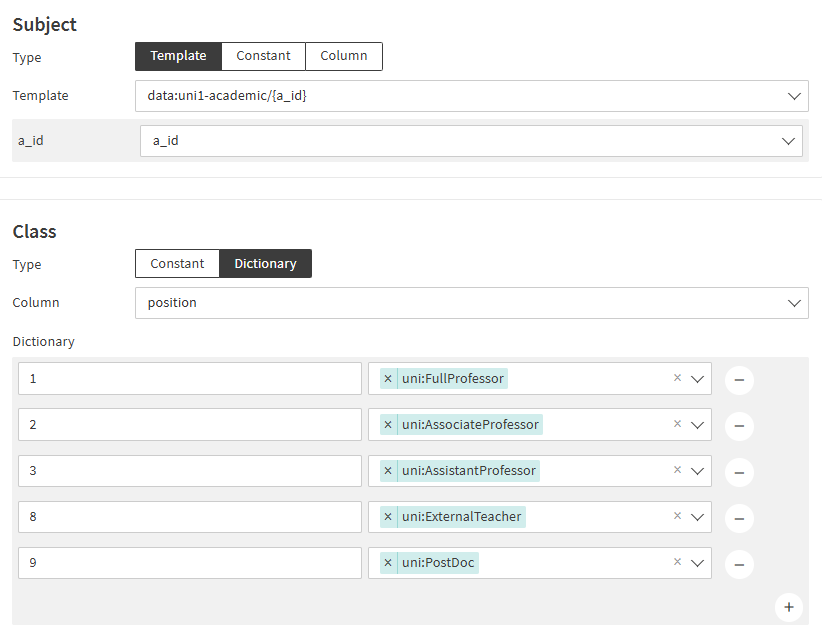
The column position is populated with magic numbers:
- 1 -> Full Professor
- 2 -> Associate Professor
- 3 -> Assistant Professor
- 8 -> External Teacher
- 9 -> PostDoc
The column a_id is the primary key.
uni1.course
The table uni1.course contains the local ID (c_id) and title of the courses.
| c_id | title |
|---|---|
| 1234 | Linear Algebra |
| 1235 | Analysis |
The column c_id is the primary key.
uni1.teaching
The table uni1.teaching contains the n-n relationship between courses and teachers.
| c_id | a_id |
|---|---|
| 1234 | 1 |
| 1234 | 2 |
There is no primary key, but two foreign keys to the tables uni1.course and uni1.academic.
uni1.course-registration
The table uni1.course-registration contains the n-n relationship between courses and students.
| c_id | s_id |
|---|---|
| 1234 | 1 |
| 1234 | 2 |
There is no primary key, but two foreign keys to the tables uni1.course and uni1.student.
# University 2
The dataset is composed of the following tables:
uni2.person
The table uni2.person describes the students and the academic staff of the university.
| pid | fname | lname | status |
|---|---|---|---|
| 1 | Zak | Lane | 8 |
| 2 | Mattie | Moses | 1 |
| 3 | Céline | Mendez | 2 |
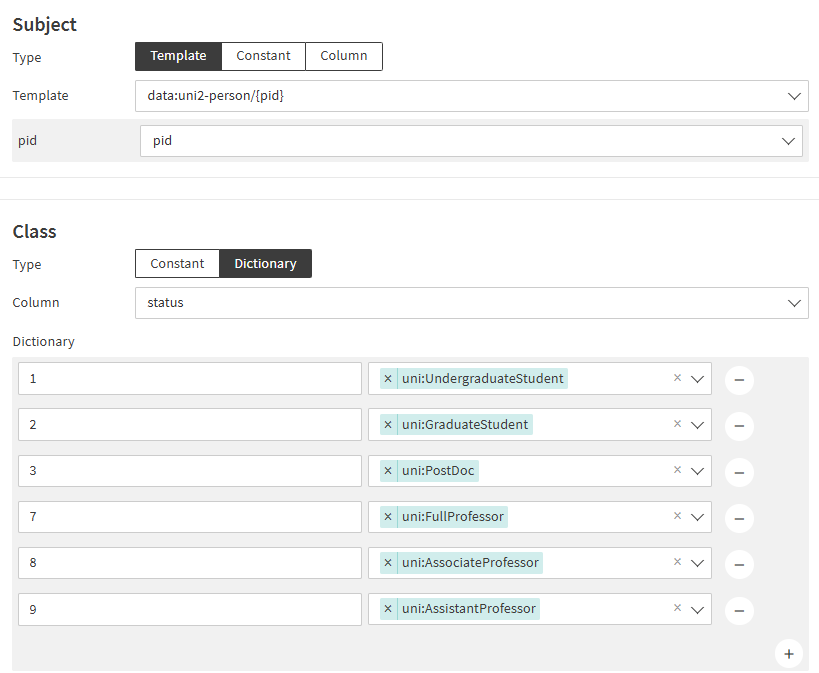
The column status is populated with magic numbers, which differ from the ones of the table uni1.academic:
- 1 -> Undergraduate Student
- 2 -> Graduate Student
- 3 -> PostDoc
- 7 -> Full Professor
- 8 -> Associate Professor
- 9 -> Assistant Professor
As you can see, undergraduate and graduate students are now distinguished.
The column pid is the primary key.
uni2.course
The table uni2.course contains information about courses, their topic, their lecturer and their lab teacher.
| cid | lecturer | lab_teacher | topic |
|---|---|---|---|
| 1 | 1 | 3 | Information security |
| 2 | 8 | 5 | Software factory |
| 3 | 7 | 8 | Software process management |
The column cid is the primary key. Note that in this data source, there are at most two teachers per course. Lecturers and lab teachers are now distinguished.
uni2.registration
The table uni2.registration contains the n-n relationship between courses and attendees.
| pid | cid |
|---|---|
| 2 | 1 |
| 10 | 4 |
There is no primary key, but two foreign keys to the tables uni2.course and uni2.person.
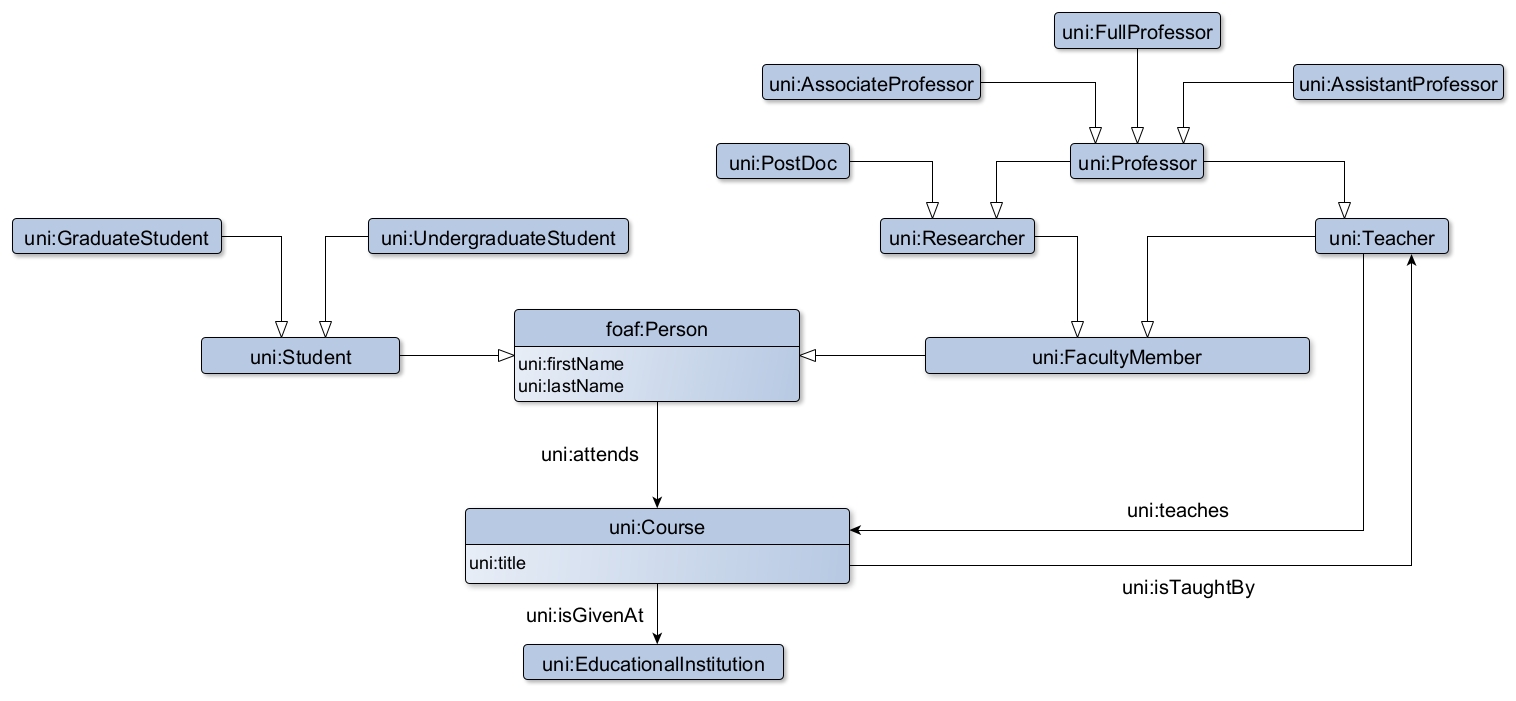
# Modelling
In this tutorial, the ontology file is provided. We will focus on the mapping and the lenses. Our goal is to reproduce the following diagram.
# Ontology
- Download this OWL ontology file
- Go to the
Ontologypage - Import the downloaded file through
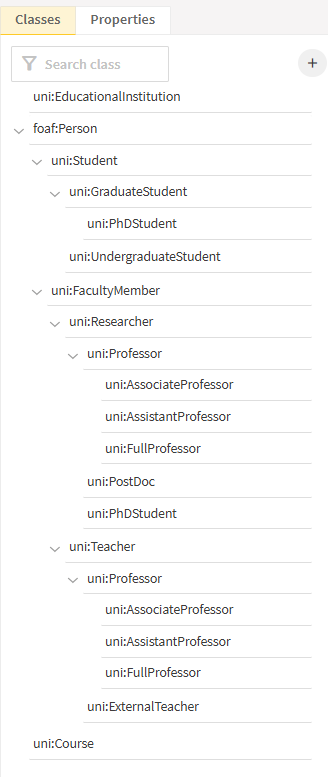
Import ontology - In the tab Classes you can visualize the class hierarchy
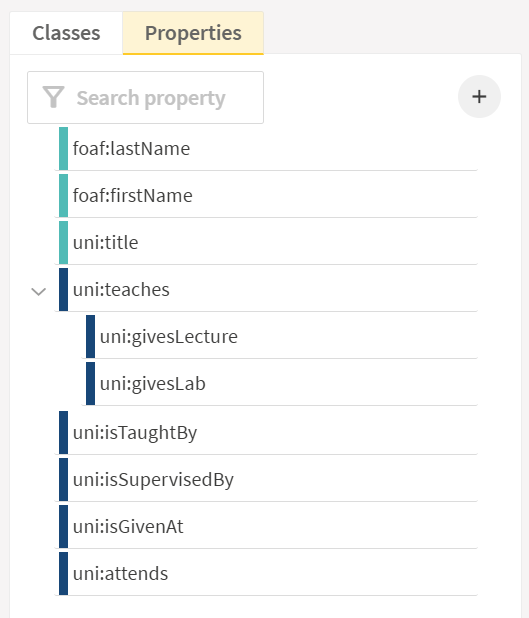
- In the tab Properties you can visualize the properties hierarchy. In particular the Data properties are firstName, lastName and title, and the Object properties are teaches (wth two sub-properties givesLecture and givesLab), isTaughtBy, isSupervisedBy, isGivenAt and attends.
# First data source: university 1
- Go to the
Data Lensespage - Among the
Source Tables(on the left), select the schemauni1to filter the tables - Select the table
uni1.studentand click onGenerate mirror lens - Click on
lenses.uni1.studenton the right to open the newly created lens - Click on
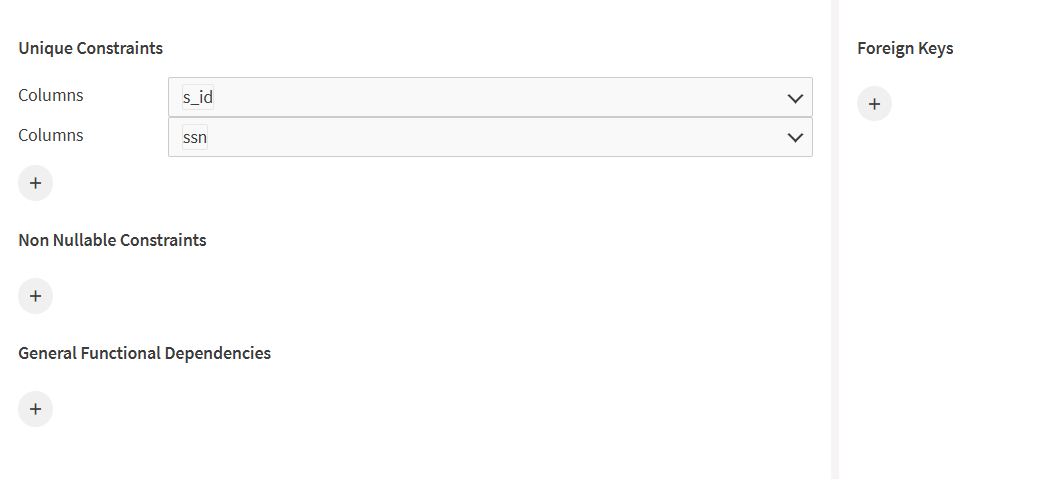
Constraintsand observe that unique constraints are defined on thes_idandssncolumn, while no foreign key is given
# Mapping uni1.student: first class mapping entry
- Go to the
Mappingpage and click on the lenslenses.uni1.student - Map all the rows to a class by clicking on the button
C+for creating a mapping entry - First of all, we need to specify the subject as a template. Make sure the option
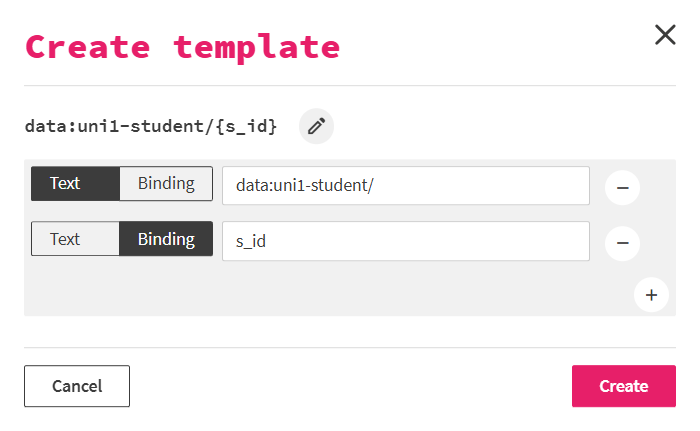
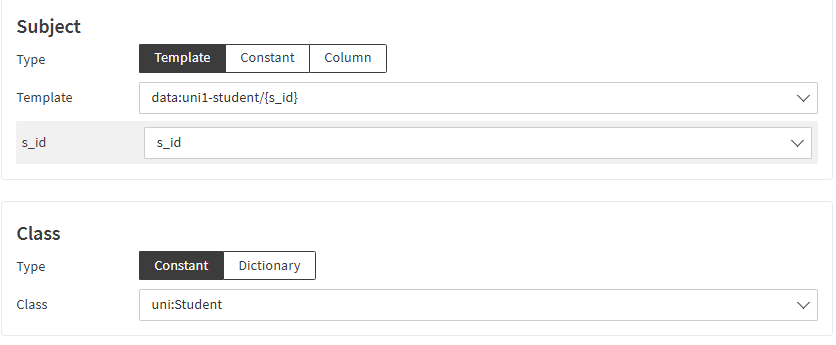
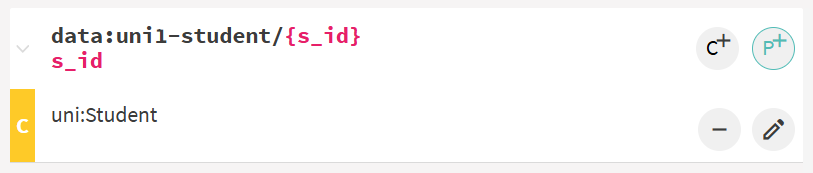
Templateis selected. Open the template menu and click onCreate new template. Ontopic Suite automatically proposes the templatedata:uni1-student/{s_id}out of the lens name and the unique constraint on the columns_id. Accept it by clicking onCreate.
- Let's now assign a class. Make sure
Constantis selected for the class. In the drop-down menu below select the classuni:Student. Click and save and you are having your first mapping entry!
# Mapping uni1.student: first data property mapping entry
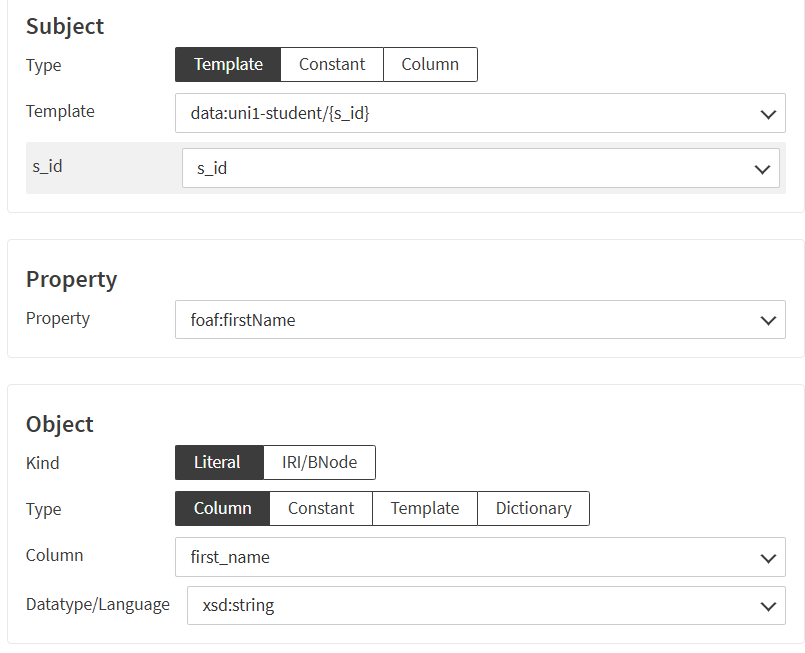
- Let's now map the first name of each student. Let's create a property mapping entry for the same subject by clicking on the button
P+on the right of the IRI templatedata:uni1-student/{s_id}.
- You should see that subject section is already filled with the same values as before. If it is not the case, you probably clicked on the other
P+button at the top of the page. In that case, go back and click on the correctP+button. - Select the data property
foaf:firstNamein the property menu. - For the object, we want to directly map the value from the column
first_name. SelectLiteraland the typeColumnand then thefirst_namein the column drop-down menu. - Notice that the datatype field get automatically filled after selecting the column as
xsd:string. This is because the column type istextand, according to R2RML (opens new window) character string types are mapped to that RDF datatype. Click and save to have your first data property mapping entry!
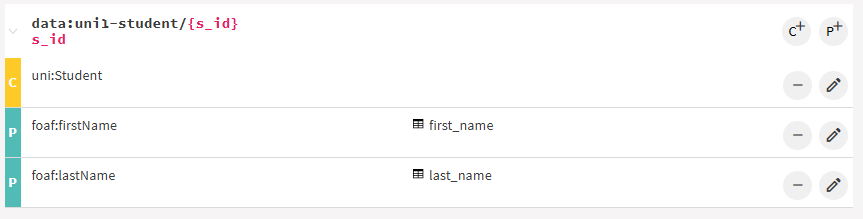
- Repeat the same steps to also map the last name of each student.
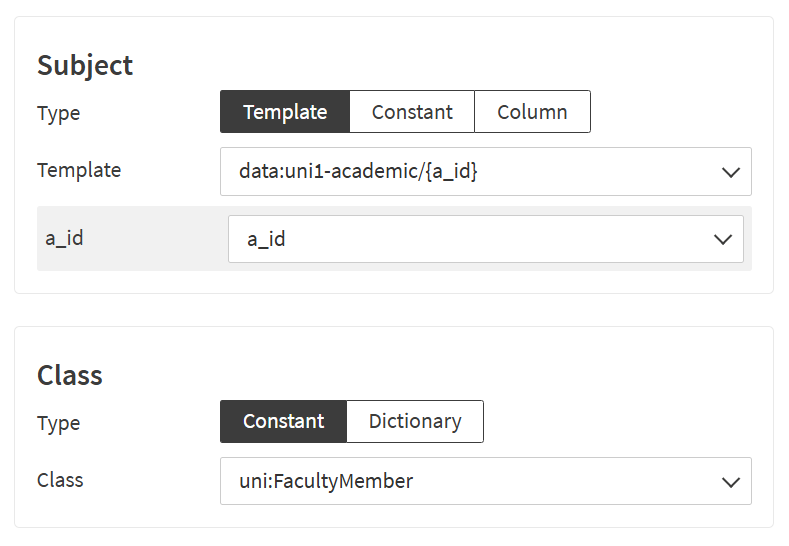
# Mapping uni1.academic
Similarly to what we did for students, we create a class mapping entry for each academic staff member and data property mappings for their first and last name.
- Go to the
Data Lensespage, selectuni1.academicand generate a mirror lenslenses.uni1.academic. We observe that there are two unique constraints on the columnsa_idandssn, while there is no foreign key. - Go to the
Mappingpage and select the lenslenses.uni1.academic - Map all the rows to a class by clicking on the button
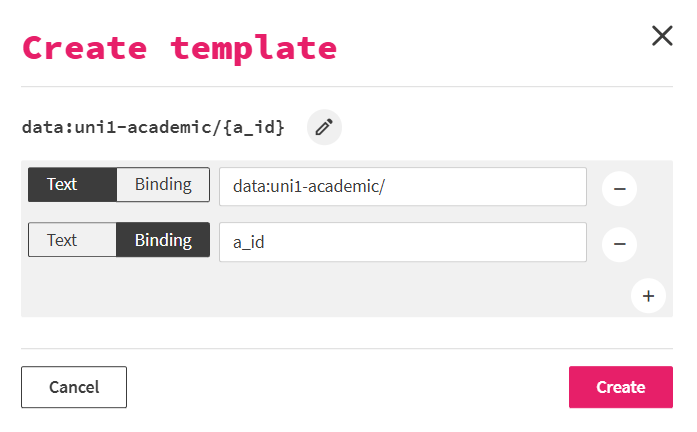
C+for creating a mapping entry. Create a new class mapping entry by clicking on the buttonC+. - As subject we create a new template: Ontopic Suite automatically proposes the template
data:uni1-academic/{a_id}using the unique constraint on the columna_id.
- Let's now assign a class. Make sure
Constantis selected and in the drop-down menu select as class the data propertyuni:FacultyMember. Save to create a class mapping for the academic staff.
- As for students, we map the first name of each academic member. Let's create a property mapping entry for the same subject by clicking on the button
P+on the right of the IRI templatedata:uni1-academic/{a_id}and select the propertyfoaf:firstNamein the drop-down menu. Finally select as object the columnfirst_nameand save. - Repeat the steps above also for the last name.
# Mapping uni1.course: first object property mapping
- Go to the
Data Lensespage, selectuni1.courseand generate a mirror lenslenses.uni1.course. We observe that there is a unique constraintc_id. - Map all the rows to a class by clicking on the button
C+for creating a mapping entry. - We need first to specify the subject as a template. Select the option
Templateand click onCreate new template. Ontopic Suite automatically proposes the templatedata:uni1-course/{c_id}out of the lens name and the unique constraint on the columnc_id. Accept it by clicking onCreate. - Let's now assign a class. Make sure
Constantis selected for the class. In the drop-down menu below select the classuni:Course. Click and save. - Map the course titles: create a property mapping entry for the same subject by clicking on the button
P+on the right of the IRI templatedata:uni1-course/{c_id}and select the propertyuni:titlefrom the menu. Finally select as object the columntitleand save. - Now we create a new object property mapping for the same subject. With the usual template as subject, select the property
uni:isGivenAt. For object, you can see that the pre-selected kind value is notLiteralas before butIRI/BNode. This is because the propertyuni:isGivenAtis declared in the ontology as an object property, so it expects an IRI or a BNode as value. The typeTemplateis also pre-selected because it is the most common mechanism for building an IRI as object. However, we select the typeConstantand type the valuedata:uni1/university, since all courses are given at the same university.
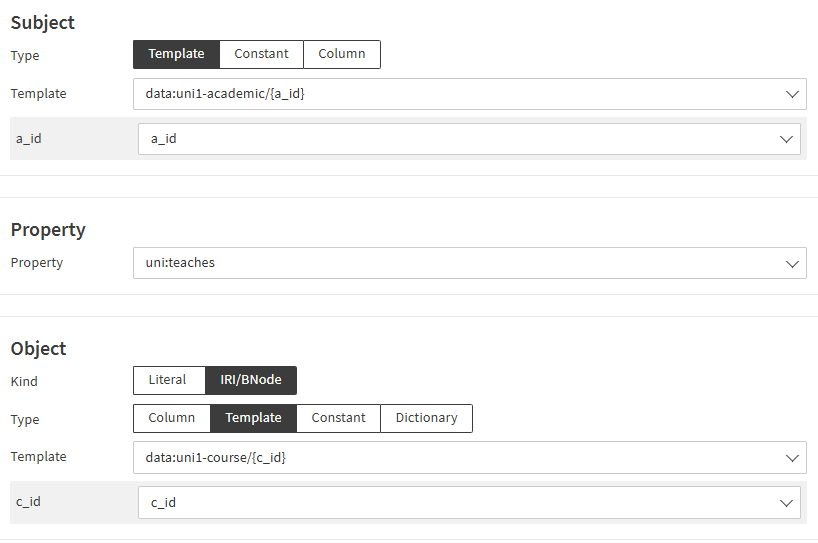
# Mapping uni1.teaching
- Go to the
Data Lensespage, selectuni1.teachingand generate a mirror lenslenses.uni1.teaching. We notice that there are not unique constraint, but two foreign keysa_idfromuni1.academicandc_idfromuni1.course. - Go to the
Mappingpage and select the lenslenses.uni1.teaching. - Let's create a mapping between the academic staff (
a_id) and the taught course (c_id) through the object propertyteaches. Click on the buttonP+. - Choose in the subject section the template
data:uni1-academic/{a_id}. Then select the propertyuni:teachesand in the object section the templatedata:uni1-course/{c_id}. Save.
# Mapping uni1.registration
- Go to the
Data Lensespage, selectuni1.course-registrationand generate a mirror lenslenses.uni1.course-registration. We observe that there are two foreign keysc_idfromuni1.courseands_idfromuni1.student. Click on0 mapping entriesto be directed to theMappingpage. - Let's create a mapping between the students (
s_id) and the attended course (c_id) through the object propertyuni:attends. Click on the buttonP+. - As subject select the template
data:uni1-student/{s_id}, the propertyuni:attendsand as object the templatedata:uni1-course/{c_id}.
# Mapping uni1.academic: subclasses
- Go to the
Mappingpage and select the lenslenses.uni1.academic. - We now want to map the subclasses of
uni:FacultyMemberdepending on the values found in the columnposition. Let's create a new mapping entry by clicking onC+on the right of the templatedata:uni1-academic/{a_id}. - For the class we don't want to assign the same value to each faculty member found in the lens, so we don't select the type
Constant, but instead the typeDictionary. - Select the column
position. - Let's now fill the first line of the dictionary. On the left field, insert the number 1 as found in the
positioncolumn of the lens. In the right field, select the classuni:FullProfessor. Everytime the value 1 is found in the columnposition, the faculty member will be declared instance of the subclassuni:FullProfessor. - Click on
+for adding a new line. Map this time the value 2 to the classuni:AssociateProfessor. - Complete with the other pairs value-class (see description of
uni1.academic) and save.
# Snapshot and mapping export
- Go on the
Dashboardpage and click onCreate snapshot. Technically speaking, it will create a Git commit with all the important files of the project. - Open the
Repositorypage to see the following snapshotted/committed files:lenses.json: definition of the lenses in the Ontop format.mapping.ttl: R2RML mapping file defined over the lenses.ontology.ttl: RDFS/OWL2QL ontology serialized in Turtle.YOUR_PROJECT.ontopicprj: internal representation of your project. Can be imported in Ontopic Suite to override the mapping, lenses and the ontology.
- Go back to the Ontopic Suite tab. Go the
Mappingpage. Click onExport mappingand then onWithout lensesto download the mapping in R2RML that directly refers to tables in the source instead of the lenses. This file is interoperable with any R2RML processor.
# SPARQL
Let's test our mapping by deploying Ontop directly in Ontopic Suite and issue our first SPARQL query.
- Go to the
Querypage. - Execute the following SPARQL query which outputs the last names of the full professors:
PREFIX uni: <http://uni.example.org/voc#>
PREFIX foaf: <http://xmlns.com/foaf/0.1/>
SELECT DISTINCT ?prof ?lastName {
  ?prof a uni:FullProfessor ;
    foaf:lastName ?lastName .
}
- Click on
View SQLto see the generated SQL query.
# Inference
Ontop embeds some inference capabilities and is thus capable of answering a query like the following:
PREFIX uni: <http://uni.example.org/voc#>
SELECT DISTINCT ?teacher {
  ?teacher a uni:Teacher .
}
These inference capabilities can be, for a large part, understood as the ability to infer new mappings from the original mappings and the ontological axioms (e.g. Professor is a sub-class of Teacher).
# Second data source: university 2
We now add the following mapping assertions together with the previous ones.
# Mapping uni2.person
- Go to the
Data Lensespage, select the schemauni2and generate a mirror lens for the tableuni2.person. Open the newly created lens. - We can see it has similar kind of information of
uni1.studentbut with different column names. Let's keep the lens as it is for the moment and start mapping it. For that, click at bottom right on0 mapping entriesto reach the mapping editing page for this lens. - Create a class mapping entry with a new IRI template
data:uni2-person/{pid}to map all the rows of the lens to the classfoaf:Personand save. - Map the first and last name of all persons through the properties
foaf:firstNameandfoaf:lastName, respectively. - Map the following values of the column
statusto create the subclasses of the classfoaf:Personby clicking on theC+next to the templatedata:uni2-person/{pid}and selecting the typeDictionary:- 1 to
uni:UndergraduateStudent - 2 to
uni:GraduateStudent - 3 to
uni:PostDoc - 7 to
uni:FullProfessor - 8 to
uni:AssociateProfessor - 9 to
uni:AssistantProfessor
- 1 to
- Snapshot the changes.
- Go to the
Querypage and update the SPARQL endpoint. - Run the previous SPARQL and observe that it now returns more results. If you look at SQL query, you will see that it now contains a UNION.
# Mapping uni2.course
- Go to the
Data Lensespage and generate a mirror lens for the tableuni2.course. - Go to the
Mappingpage and select the lenslenses.uni2.course. - Create a class mapping entry with a new IRI template
data:uni2-course/{cid}to map all the rows of the lens to the classuni:Courseand save. - Map the course title to the property
uni:titleand select the columntopicand save. - Create the property
uni:isGivenAtfor the same subject. As object choose the kindIRI/BNodeand the typeConstantwith valuedata:uni2/university.
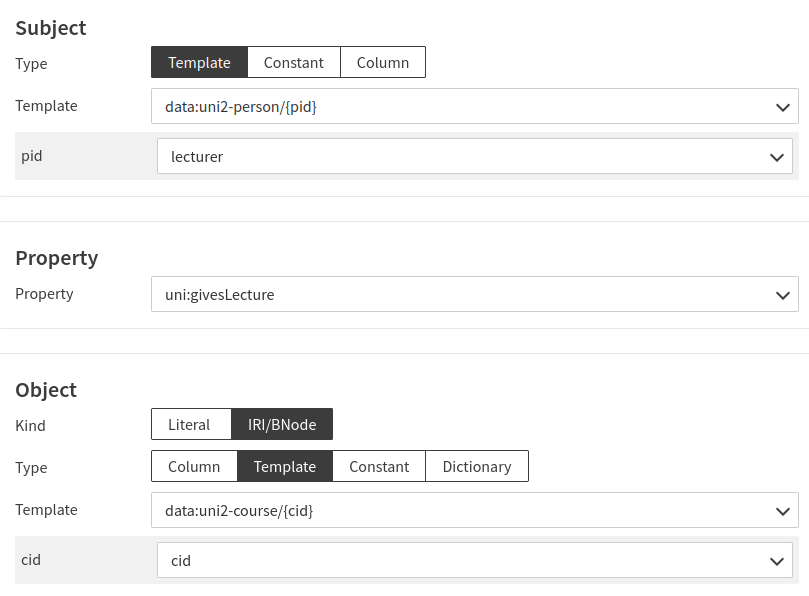
# Mapping uni2.course: lecturers and lab-teachers
- Go to the
Mappingpage and select the mirror lenslenses.uni2.course. - Create a new property mapping entry by clicking on the button
P+. - As subject select the template
data:uni2-person/{pid}andlectureras binding. Note that thepidin the template is not a column name but just a placeholder that in this case is associated with the columnlecturer. - Click on the property
uni:givesLecture. - As object keep the default kind
IRI/BNodeand select the templatedata:uni2-course/{cid}.
- Repeat the last four steps by modifying only the binding of the template to
lab_teacherand the property touni:givesLab.
# Mapping uni2.registration
- Go to the
Mappingpage and select the mirror lenslenses.uni2.registration. - Create a new property by clicking on the button
P+. - As subject select the template
data:uni2-person/{pid}, the propertyuni:attendsand as object the templatedata:uni2-course/{cid}.
# SPARQL
We can now run the previous SPARQL queries and observe that the results combine entries from the two datasets.